


Changing wheels
Wheel changes must always be carried out correctly. The following instructions show how to remove and mount a wheel and what is important to keep in mind. Make sure that the tire dimension is approved for use on the vehicle.
Warning
- If a tire must be changed near passing traffic, make sure all passengers move to a safe location.
- Use a jack intended for the vehicle when changing a wheel. For any other job, use stands to support the vehicle.
- Never crawl under or allow any part of your body to be extended under a vehicle supported by a jack.
- Never let anyone remain in the vehicle when it is raised on a jack.
Important
- When the jack is not being used, it should be stowed in its designated spot in the foam block in the frunk.
- The jack provided with your vehicle is intended to be used only in temporary situations such as changing wheels in the event of a flat tire. Only the jack that came with your particular model should be used to lift the vehicle. If the vehicle needs to be lifted more frequently or for a prolonged period, using a garage jack or hoist is recommended. Always follow this device's instructions for use.
Removing a wheel
Read through the instructions below before you begin. Before raising the vehicle using a jack or lift, take out all the tools you will need.
Turn on the vehicle's hazard warning flashers if a wheel change must be performed in an area with traffic.
Apply the parking brake and put the gear selector in P.
Take out the jack, towing eye, lug wrench and tool for removing the wheel bolt cover, which are stowed in the foam block under the cargo compartment floor.
Place chocks in front of and behind the wheels that are still on the ground. For example, use heavy wooden blocks or large stones.
Using the lug wrench, screw the towing eye into place as far as possible. The towing eye must be screwed in to its fully tightened position.

Use the designated tool to remove the wheel bolt cover in the middle. Press the tool into the hole in the middle of the wheel bolt cover and pull to remove the cover.
With the vehicle still on the ground, use the lug wrench/towing eye to loosen the wheel bolts ½-1 turn by pressing downward (counterclockwise).
Follow these instructions for safe lifting of the vehicle using a jack.
Raise the vehicle until the wheel to be changed can move freely. Unscrew the wheel bolts and lift off the wheel.
Mounting wheels
The vehicle must be raised high enough so that the wheel you are removing can turn freely.
Clean the contact surfaces between the wheel and the wheel hub.
Lift the wheel into place. Tighten the wheel bolts securely.
Do not grease the wheel bolt threads.
Lower the vehicle so that the wheel cannot rotate.
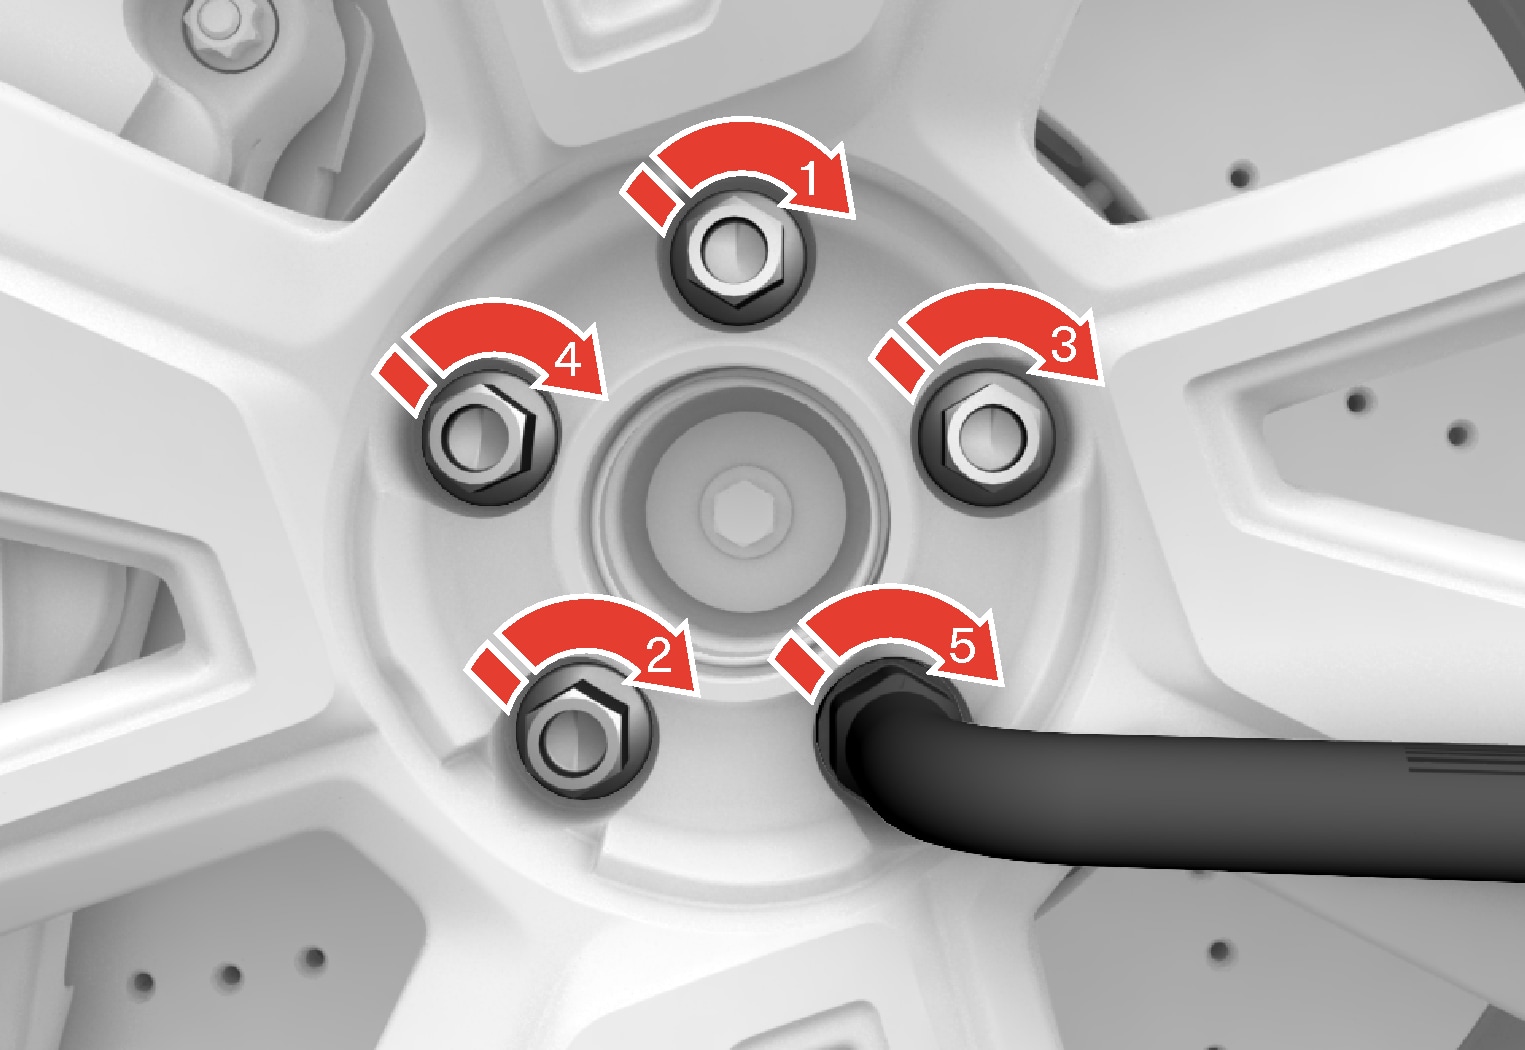
Tighten the wheel bolts in a crisscross pattern (as shown in illustration). It is important that the wheel bolts are securely tightened. Tighten to 140 Nm (103 ft. lbs.). Use a torque wrench to check torque.
Replace the wheel bolt cover over the wheel bolts by aligning it with the guide marks and then pressing it into place.
Check the tire inflation pressure and store the new inflation pressure in the tire pressure monitoring system*.
Warning
The wheel bolts may need to be tightened again several days after a wheel change. Temperature fluctuations and vibrations can cause them to loosen slightly.
Note
- After inflating a tire, always replace the valve cap to help prevent valve damage caused by gravel, dirt, etc.
- Use plastic valve caps only. Metal caps could corrode and become difficult to remove.